For Makara Shankranti festival, in certain regions of Karnataka, families exchange mixture of Ellu (white sesame seeds) Bella (Jaggery) which is mixed with peanuts, neatly cut dry coconut along with sugar candy molds of various shapes with a piece of sugarcane. It is for renewal of relationships. We normally pack the mixture in a plastic bag with the sugar candy.
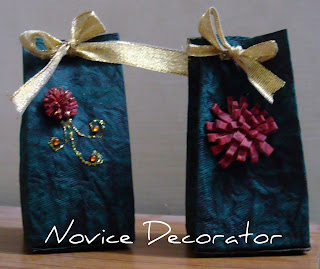
This year my SIL R decided to make fancy goodie bag to pack this. Her goal was for it to be plastic free.
They were so beautiful, hence this post. Here it is.
Materials required:
- Paper-could be a decorative gift wrapping paper,hand made paper,newspaper/ magazine(-to recycle is good ). Here I've used handmade paper of 0.5mm thickness.
- Scissors,a paper punch,ruler,glue and a decorative ribbon.
- Stickers,glitter glue, etc., can also be used.
Cut the paper for 21.5cms length and 15cms breadth.Make markings at 5,10,15,20 and score the paper.Similarly, score the paper at 5cms on the 15 cm side. You will see four rectangles of 10x5 cm and 4 squares of 5 cm and, a small rectangle of 10x1.5cm and another rectangle of 5 x 1.5cm (lower right corner of the image). After the cut, your paper must look like this.
 |
Glue the 'x' marked squares- the 2nd, 3rd and the 4th squares |
Next step
 |
 |
Push two opposite sides towards each other gently and press together the other two sides. Punch two holes on each side of the box such that the holes are aligned.
Now on to decorating the bag.
Now on to decorating the bag.
Take a piece of coloured paper about 2cms wide and 8cms long.Fold it into half and make cuts through the paper as shown. open the fold and glue the paper on the inside. Fold the paper and glue the paper on one side. Roll the paper into a flower as shown. Glue the base and the outer petals of the flower.
Stick the flower on the bag and flatten the outer petals such that they stick to the surface. Needle the decorative tape through the holes with both free ends of the tape on one side.
Tie the ribbon and decorate the the goody bag with glitters and stickers. You may try out different sizes and versions of the same. Before starting off, make a prototype of the bag with a newspaper or a magazine so that you will know what changes can be made. These bags are plastic free and look pretty.
Linked it here.
Friday Fun Party & Features
Colours Dekor
Joyful Stamper


Thats so cute...and quite an innovative way to go green...
ReplyDeleteKudos to your SIL for this simple, yet meaningful way of going green..even while celebrating within the traditions
Oh my gosh.. this is sooooooooooo pretty!! I was thinking of making these for Christmas, but as always.. ran out of time.. *smiles*
ReplyDeleteVery pretty
ReplyDeleteWow.. This is an awesome idea.. These can be great as goodie bags for the parties.. :)
ReplyDeletethanks for linking!
Love
Hani
So beautiful they look and Thank You for sharing the steps too
ReplyDeleteCheers
Sonia
cardsandschoolprojects.blogspot.com
Thanks everyone :)....Am Glad you liked it.Have a good day!
ReplyDelete-R
Thank you all.
ReplyDeleteThis is a really nice DIY... Quite a handy idea for party giveaway bags...
ReplyDelete